Replacing a home thermostat often looks like a wiring puzzle, but a short compatibility checklist removes most of the guesswork. Start by identifying your HVAC system type and matching it to a wiring diagram, since single-stage forced-air, heat pump, boiler, ductless mini-split and line-voltage systems behave differently during a smart thermostat swap. Read terminal letters (R, W, Y, G, C, O/B) on the old control, check whether the system uses 24V versus 120/240V or millivolt controls, and run manufacturer compatibility checkers. Missing C-wire problems and unusual setups (dual transformers, zoned controllers, proprietary furnace boards, line-voltage equipment) are the most common snags for DIY installs and may mean you should hire a technician.
Quick summary
Identify your HVAC type, confirm voltage and terminals, and check for a C‑wire before buying. Read terminal letters rather than relying on wire color. Use vendor compatibility tools from Ecobee, Nest or Honeywell and consult The Homekit Hub for HomeKit-focused advice. Turn off breakers, photograph and label every wire, then test heat, cooling and fan after the swap; hire a pro for line-voltage, millivolt systems, dual transformers or zoned setups.
Replacing home thermostat: quick compatibility checklist
Before replacing home thermostat, follow this checklist: identify system type, confirm the control voltage, note terminal letters at the thermostat and HVAC control board, and run a manufacturer compatibility check (upload a wiring photo or enter the lettered terminals). Seeing both R and C usually means a 24V smart thermostat will work; missing C or nonstandard wiring is the most common snag. Call a pro if you find dual-transformer setups, zoned controllers, proprietary boards or line-voltage equipment.
Start by identifying your HVAC system type. Check the outdoor unit and the indoor furnace or boiler: single-stage forced-air systems usually have a furnace and an outdoor condenser, while a heat pump both heats and cools and often uses an O or B wire. Boilers, ductless mini-splits and line-voltage electric baseboards typically need specialty thermostats or a professional install because they don’t use standard 24V control wiring.
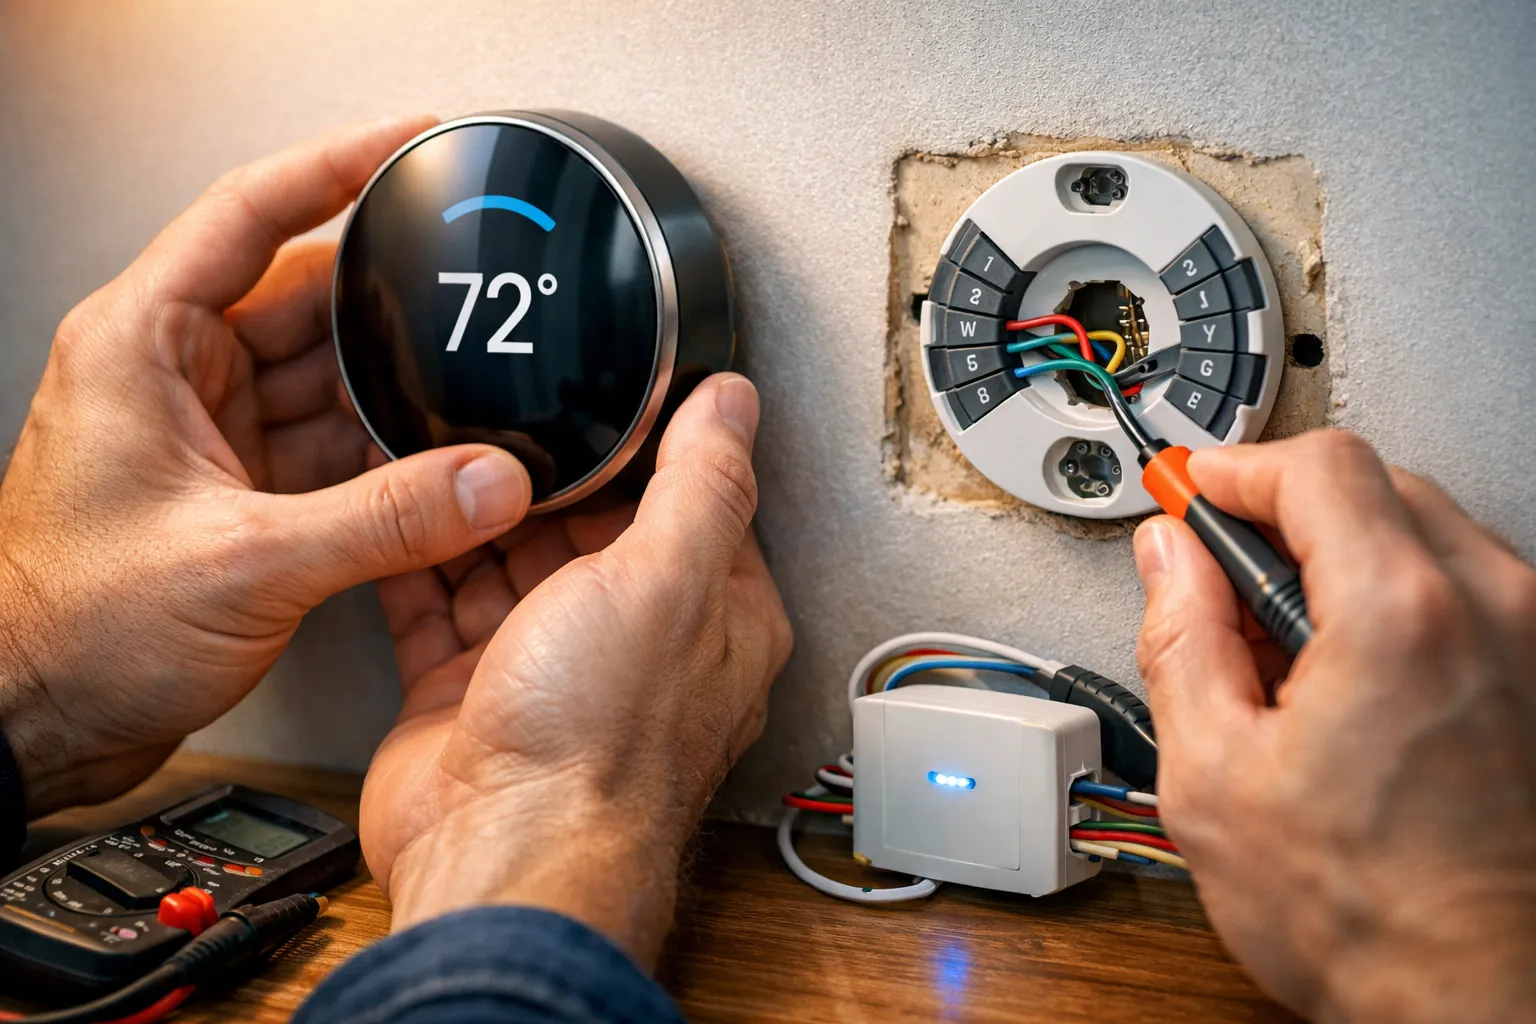
Next, check wiring and voltage: turn off the breaker, remove the thermostat cover, photograph the wiring and record terminal labels such as R, W, Y, G, C and O/B. Systems running on 120/240V or millivolt controls use different hardware and generally require a specialist. Use manufacturer tools from Ecobee, Nest and Honeywell to flag multi-stage systems and C‑wire issues; consult The Homekit Hub’s compatibility matrix for HomeKit-specific guidance.
If you’re deciding whether to hire help, choose a technician for dual transformers, zoned systems, multi-stage commissioning, line-voltage or millivolt setups. Gather wiring photos and model numbers to speed a professional visit.
Thermostat wiring basics: labels, colors and the C‑wire
Read terminal letters first and treat wire colors as guides. Most systems use R (power), W (heat), Y (cooling/compressor), G (fan), and C (common); O or B switches refrigerant direction on heat pumps and E is emergency heat. The C‑wire provides continuous 24V power for smart features and prevents reboots and connection drops—without it, many smart units may reboot or lose Wi‑Fi when running the radio or backlight. Always verify labels at the thermostat base or HVAC control board before touching wiring. For a concise manufacturer-oriented explanation of the common or “C” wire, see the thermostat C‑wire guide.
If you don’t have a C‑wire, options include a plug‑in 24V adapter, a manufacturer’s power connector (for example Nest’s), repurposing G as C with a fan workaround and relay, running a new conductor from the control board, or choosing a thermostat built to work without a C‑wire. Use a power adapter for a quick temporary fix, run new wire for a permanent solution, and use manufacturer connectors when they match your thermostat and system. For a simple definition and examples of the common wire and its role, review what is a common wire.
FAQ
How can I confirm a wire is the C‑wire? Turn off the breaker, remove the thermostat cover and look for the C terminal label at the thermostat base. If unsure, trace the conductor to the HVAC control board to confirm it lands on the C screw or use a multimeter to check continuity to the system common with R powered off.
Can I repurpose the G wire as C without losing fan control? You can convert G to C to power a smart thermostat, but you usually sacrifice direct fan control unless you add an adapter or a relay at the air handler. Choose this only if you accept the trade-off or plan to add a relay later; otherwise run a dedicated C conductor for a cleaner solution.
Step-by-step swap: tools, safety and the install process
Gather the right tools: a voltage tester or multimeter, flat and Phillips screwdrivers, a level, labels or masking tape, a drill with anchors and fresh batteries if required. For safety, turn off the breaker feeding the HVAC, verify zero voltage at the terminals with your tester, and photograph the wiring before you touch anything. Wear safety glasses when drilling and keep small parts in a container. If you want a concise walk-through of physical installation steps and mounting tips, Home Depot’s how to install a thermostat guide is a helpful reference.
When removing the old thermostat, label every wire and photograph the terminal block. Mark each wire with tape matching the terminal letter, loosen screws and secure conductors so they don’t fall behind the wall. Mount the new base level, feed the labeled wires through, tighten each terminal snugly and remove any factory jumpers only as your wiring or manual requires. Install batteries if needed and tuck slack behind the base to keep sensors clear.
Restore power and follow the thermostat app’s system detection screens while watching for C‑wire or compatibility alerts. If the system detects the correct stages, the installation is complete; otherwise run the troubleshooting and verification steps below. Most smart thermostats work best with a C‑wire for steady power, though some models use battery-assisted modes or manufacturer adapters.
Testing and troubleshooting: what to run after the swap
After replacing a home thermostat, run a three-minute function test: call for heat, call for cool, run the fan and verify sensor readings. If the system doesn’t respond, start with basic power and wiring checks before moving on to network or advanced fixes. Most failures clear after a power cycle, reseating terminal screws or checking the fuse and breaker.
Quick function tests to run right away
Spend a few minutes and methodically confirm each control path works:
- Call for heat: set the thermostat above room temperature and listen for the furnace or a zone valve to respond.
- Call for cool: set it below room temperature and confirm the outdoor compressor and indoor blower start.
- Run fan only and check blower speed; compare the thermostat temperature readout to a separate thermometer.
Common problems and fixes (blank screen, short cycling, Wi‑Fi drops)
A blank screen usually indicates lack of 24V power—check the air handler fuse, confirm R and C are secure and verify the breaker is on. Short cycling often stems from wiring errors or power‑stealing behavior; inspect for loose wires, ensure correct system configuration and consider a common power adapter if the blower cycles rapidly. Wi‑Fi drops typically trace back to power instability or a weak signal—confirm steady 24V power, consider a power extender and improve router placement or add a mesh node. Before calling a pro, reseat terminal screws, confirm 24V power and reboot both the thermostat and the router.
When to reset, when to rollback, and when to call a pro
Factory-reset only after basic checks fail. Reseat wires and terminal screws, confirm the fuse and breaker and verify 24V power before attempting a reset. Reinstall the original thermostat if the HVAC does not respond, you see burnt wiring, or you encounter combustion concerns. Call a pro for line-voltage systems, gas-valve or combustion issues, multi-zone control boards, or dual-transformer setups. Before the technician arrives, take photos of wiring terminals, note model numbers and record symptoms and test results.
Smart setup and savings: programming, sensors and HomeKit tips
Use simple setback schedules and add remote sensors only when rooms consistently differ from the main temperature. Set two to four setback windows per day (wake, away, return, sleep) rather than dozens of small changes. Remote sensors pay off for persistent hot/cold spots or large open plans; otherwise they add complexity and cost. Prefer native HomeKit models when possible; if using non‑HomeKit devices, run Homebridge or a reliable bridge plugin and follow The Homekit Hub’s guides to avoid token resets or missing sensor support. See the Sample Page — The Homekit Hub for additional HomeKit-focused tips and example setups.
DIY vs pro: time, cost and when to hire help
If you’re comfortable with low-voltage wiring and turning off breakers, a simple thermostat swap is a weekend job (typically 30–90 minutes). Hire a pro when you need new wiring, line-voltage work, millivolt systems, multi-zone commissioning or when you encounter dual transformers or proprietary control boards. Budget for thermostat hardware ($50–$300) and possible power adapters or labor; check local rates and utility rebates before you buy. For a practical look at whether a smart thermostat will work with your existing system types and common gotchas, consult a dedicated smart thermostat compatibility resource.
A technician can run new C wiring safely, test transformer voltage, diagnose control board faults and handle line-voltage or zoning systems that DIYers should avoid. Their work reduces guesswork and downtime; see Hello world! — The Homekit Hub for a pro install playbook and on-site checklist of expected steps.
FAQ
Do all smart thermostats need a C‑wire? Most need one for reliable power and stable Wi‑Fi, although some models use battery-assist modes or manufacturer power adapters as workarounds. Those options can work short-term but may require occasional maintenance or introduce quirks during power transitions.
How long will a DIY replacement take? Expect about 30–90 minutes for a simple swap; running new wiring or diagnosing control boards adds time. Plan for extra time if you need to access the air handler or if there is limited wire slack behind the thermostat.
Can I reuse the old wall plate? Usually yes, though you might need a trim plate if the screw holes or mounting footprint don’t line up. Keep the old plate until the new thermostat is fully tested so you can revert if needed.
What about multi-zone systems? Multi-zone setups often require a pro because they use controllers, dampers and more complex wiring. If you have motorized dampers or a zone control board, gather model numbers and photos before calling a technician.
Are there rebates? Many utilities and energy programs offer rebates for smart thermostats or C‑wire installation; check local programs and manufacturer promotions before you buy and keep receipts for any professional work.
Affiliate disclosure: We may earn a commission from links to products on Amazon at no extra cost to you. Links are selected for usefulness to common installation scenarios, not paid placement.
Amazon deals
- Ecobee SmartThermostat with Voice Control (EB-STATE5) ($249)
- Google Nest Learning Thermostat (3rd Gen) ($249)
- Honeywell Home T9 Smart Thermostat ($169)
- Ecobee Power Extender Kit / Power Connector ($20–$40)
- Klein Tools non-contact voltage tester (NCVT-1) ($20)
- Basic low-voltage thermostat installation kit: screwdrivers, labels, anchors ($15)
Final thoughts on replacing home thermostat
Replacing home thermostat goes smoothly when you focus on a few practical steps: identify the HVAC type, confirm voltage and terminals, check for a C‑wire before you buy, map your terminals, photograph wiring and follow safety steps. Those basic checks stop most headaches and make the install predictable. Start by turning off the HVAC breaker, removing the thermostat cover and taking clear photos of wiring labels and the furnace control board. Use The Homekit Hub’s compatibility checklist and C‑wire fix guide to pick the right model and know whether you need a professional.
Leave a Reply