Smart home systems can automate routine tasks and help cut energy costs. Whether a setup delights or frustrates usually comes down to a few decisions: which hub you choose, whether devices use Zigbee, Z‑Wave, Thread, or Matter, and whether you go DIY or hire a pro. This guide focuses on the practical components that make a measurable difference so you can start small and avoid costly rewiring.
This guide begins with visible wins—lighting, climate, and security—and explains when Wi‑Fi bulbs are easier to deploy than Zigbee options, why many people pick Philips Hue for its ecosystem, and how motion sensors plus schedules can automate porch lights. It covers thermostats like Nest and Ecobee, how multi-room sensors enable zoned comfort, and the trade-offs between DIY and professionally monitored systems such as Vivint. You’ll also find notes on automation platforms, integrations with Alexa, Google Nest, and HomeKit, and how to pick hubs that keep devices talking.
Quick summary
Start small: begin with one room and a HomeKit-certified bulb or a starter kit to get immediate automations. A small pilot reveals design problems early and helps avoid expensive rewiring or platform lock-in.
Pick a hub: match your voice ecosystem to your priorities. HomeKit favors local processing and stricter privacy, Google leans on predictive routines, and Alexa offers the widest device support—your hub choice shapes which devices and automations are easiest to run over time.
Check protocols: prefer Matter or Thread where they meet your needs, and confirm Zigbee or Z‑Wave compatibility before you buy. Verifying protocol support reduces future bridging work and device clashes.
Secure your network: segment IoT traffic on an isolated VLAN or SSID, use strong passwords, and keep firmware current to reduce hacks and flaky behavior. These steps simplify troubleshooting when devices go offline and limit the blast radius if something goes wrong.
DIY vs pro: DIY saves money for single-room projects and hobbyists, while professional installs and monitoring pay off for whole-home systems or high-security needs. Factor in ongoing fees and warranty coverage when you decide.
How smart home systems are built: core components
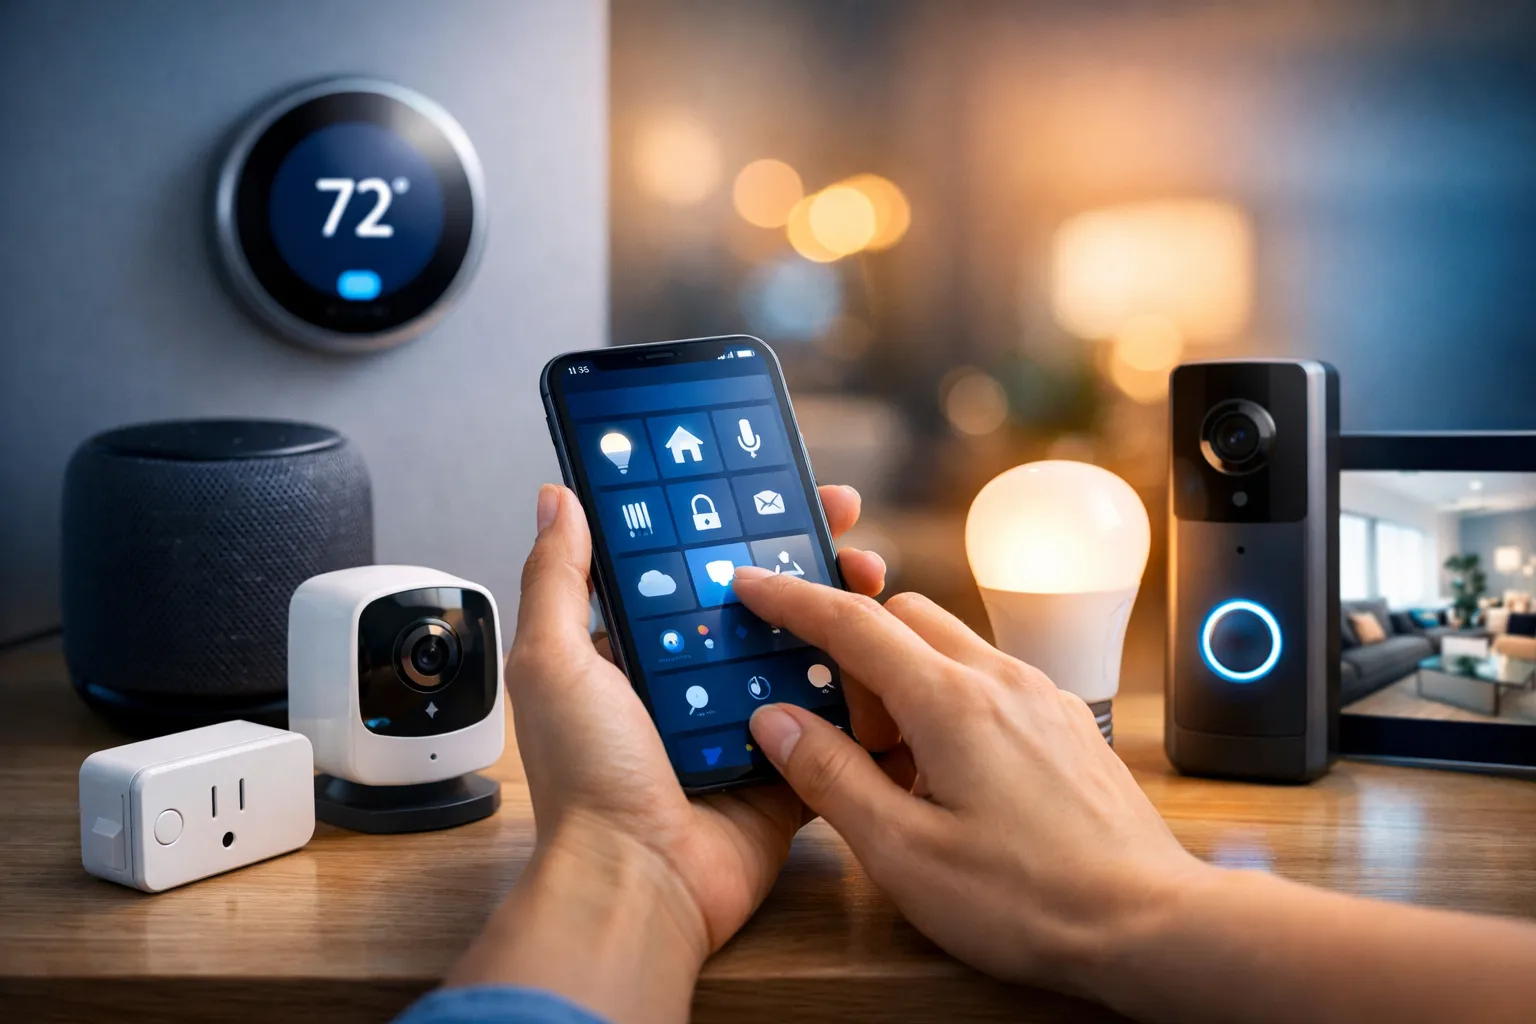
Quick take: Most smart home systems center on three building blocks: lighting, climate control, and security. These components coordinate through hubs and voice ecosystems so devices behave like a single system, and the usual path is to start with visible wins, then add sensors and a hub as you scale.
Lighting, switches and bulbs
Lighting is the easiest place to start because changes are visible and provide immediate value. Wi‑Fi bulbs plug directly into your network for simple setups, while Zigbee bulbs use a low-power mesh and usually perform better with a dedicated bridge for reliability. Smart switches let you keep existing fixtures and control non-bulb circuits, which matters if someone prefers a physical switch. For automations, pair motion sensors with schedules to create presence-based porch lights that come on at dusk and stay off during daylight.
Thermostats and climate control
Thermostats handle both comfort and energy use, and learning models like Nest and Ecobee can automate schedules. A single thermostat reads one spot, so adding multi-room sensors reduces hot or cold dead zones and enables zoned automation. When paired with presence data and hub-driven rules, learning thermostats can cut bills; start with a core thermostat and add sensors where comfort gains are clear.
Security, cameras and access control
Security choices split between DIY cameras you install yourself and professionally monitored systems such as Vivint or ADT, which include guaranteed response and warranty coverage. Smart locks from Nest x Yale, Schlage, and Eufy simplify access, but plan for keys, backup codes, and power-outage contingencies before swapping deadbolts. Cloud subscriptions add multi-day history and smarter alerts, while local storage keeps ongoing costs down—weigh convenience against recurring fees. Cover entry points first, then expand to yards and interior zones based on need.
FAQ
Do I need a hub to run everything? Not always. Many Wi‑Fi devices work independently, but a hub that supports Zigbee or Z‑Wave improves reliability and helps mixed-brand devices coordinate across Alexa, Google, and HomeKit. A hub also makes local automations simpler and reduces dependence on cloud services.
Are camera subscriptions required? Many cameras function without subscriptions, but cloud plans add history, person detection, and smarter alerts. If you want zero monthly fees, choose cameras with local storage or an NVR and be prepared for more hands-on maintenance.
Pick the right hub and voice ecosystem
Quick take: Choose the voice ecosystem that fits your priorities: Alexa for wide device support, Google for predictive routines and Assistant features, and HomeKit for tighter iPhone integration and on-device processing. The hub you pick will shape which devices and automations are easiest to run long term.
Think of voice ecosystems as having different strengths. Alexa gives broad compatibility and many third-party skills, Google excels at Assistant-driven routines tied to Google services, and HomeKit uses stricter certification and local processing for better privacy. That pattern should guide your device selection from the start.
Hubs and controllers manage local orchestration, protocol bridging, and reliable automations. SmartThings reduces setup friction, Home Assistant rewards time with powerful local-first automation and deep customization, and Homebridge helps non-certified gear appear in HomeKit. As a loose guideline: SmartThings for minimal fuss, Home Assistant for deep control, and HomeKit if you are committed to the Apple ecosystem.
Matter aims to reduce ecosystem lock-in by standardizing application-layer communication, though older Zigbee and Z‑Wave devices still need bridges and some features may not map directly. Pick Thread- and Matter-capable devices when they meet your needs to ease future compatibility. For beginners, start with SmartThings or Google Nest for low setup friction and consider Home Assistant later if you want full local control.
Protocols and device compatibility explained
Quick take: Know the roles: Zigbee and Z‑Wave handle low-power device networking, Thread provides an IP-based mesh, and Matter aims to tie devices together at the application layer. Check compatibility pages and prefer Matter or native HomeKit badges before you buy, and use bridges or USB sticks to add missing protocol support to DIY controllers.
Zigbee works well for mesh lighting and low-power sensors, which is why you see it in Philips Hue bulbs and IKEA TRÅDFRI devices. Z‑Wave provides reliable, longer-range links and is common in door and motion sensors. Thread is a modern IP-based mesh used by recent Nest and Eve products, and Matter sits above these protocols to enable cross-brand interoperability across ecosystems.
Bridges and USB dongles translate protocols so platforms can talk to devices. A Hue Bridge turns Zigbee bulbs into a single platform endpoint, an Aeotec Z‑Stick adds Z‑Wave to DIY controllers, and the Home Assistant SkyConnect brings Thread and Matter support to self-hosted hubs. Pay attention to Z‑Wave regional frequency differences and consider USB sticks if you want local control and wider device choices. For a practical explainer on the tradeoffs between Zigbee, Z‑Wave and Thread, see what to know about Zigbee, Z‑Wave and Thread.
FAQ
Q: Can a single hub handle Zigbee, Z‑Wave, Thread and Matter? Few hubs support all four natively; most setups rely on bridges or USB sticks to add missing protocol support, or use Matter as a software-level bridge. That hybrid approach gives the best device choice today.
Q: Is Z‑Wave secure across regions? Z‑Wave uses robust security, but regional frequency differences mean a device bought overseas may not work locally. Always match a Z‑Wave device to your region before buying.
Amazon deals
Here are a few items that many DIYers add to support protocols or start a room pilot. Check the links for current prices and regional availability before you buy.
- Philips Hue Bridge (search) ($59)
- Aeotec Z‑Stick USB (search) ($69)
- Home Assistant SkyConnect (search) ($49)
For curated lists of top kits and recommended devices, see the best smart home devices roundup.
Network planning, security and privacy basics
Quick take: Build a reliable mesh, segment IoT traffic, and lock down access. A stable backhaul and an isolated IoT VLAN are priorities that keep gadgets online and data private whether you use DIY smart home systems or a professionally installed setup.
Start with good placement for mesh nodes or a wired backhaul so radios do not fight for airtime; poor placement and congested channels cause dropped devices. Put cameras and high-bandwidth sensors on a separate SSID or VLAN so video streams do not starve low-bandwidth sensors. Prefer 2.4 GHz for long-range sensors and disable features like band steering if devices keep dropping to simplify troubleshooting.
Security hardening is practical and straightforward: keep firmware current, use unique strong passwords, enable two-factor authentication, and change default admin credentials. Disable UPnP if you do not need it, close unused ports, and limit remote management to VPN access. Choosing local-first architectures for critical automations reduces the attack surface and keeps essential functions running if cloud services fail.
Local platforms like Home Assistant and HomeKit run faster and preserve privacy, while cloud features provide convenience such as remote access and AI-based routines. Use local-first options for safety-critical or privacy-sensitive functions, and enable cloud features selectively where the convenience benefit is clear. After securing your network, evaluate costs and decide whether to DIY or hire professionals.
Frequently asked questions
Q: Do I need a separate VLAN for every camera? No. Group cameras and other high-bandwidth sensors on a single isolated VLAN or SSID to simplify management and limit the blast radius. That provides performance isolation without unnecessary complexity.
Q: Can I trust cloud backups for my automations? Cloud backups are convenient but not a substitute for local exports of your configuration. Use cloud backups for redundancy, and keep local copies so you can restore quickly if a provider changes terms or goes offline.
Costs and the DIY vs professional decision
Quick take: Expect wide ranges: a DIY starter kit can be under $300 for a single room, a scaled DIY home commonly falls in the $300–$1,500 band, and professional whole-home installs can range from a few thousand to five figures. Ongoing monitoring and cloud services typically add $18–$53 per month, so include those in lifetime cost estimates. See a detailed cost breakdown at how much home automation costs.
Concrete budgeting helps. A basic single-room lighting and plug setup can cost under $300, a hub with locks and cameras often lands in the $300–$1,500 band, and full security plus integrated audio or automation frequently exceeds $1,500 when you include labor. For major projects, factor in professional labor and equipment so top-tier systems can reach five figures.
Decide based on home size, number of zones, whether you need 24/7 monitoring, and system complexity such as multi-zone HVAC or whole-home audio. Also consider your tolerance for troubleshooting and firmware updates when choosing DIY versus professional installation. These factors will determine whether the upfront savings of DIY are worth the additional maintenance over time.
Practical starter builds look like this: budget under $300 for lighting plus smart plugs, $300–$1,500 to add a hub, a smart lock, and one or two cameras, and $1,500+ for professionally installed security or whole-home automation bundles. Watch subscription traps such as mandatory cloud video storage and tiered features tied to monthly plans. Compare contract terms, monitoring features, and warranty coverage before you commit.
FAQ
Q: Do I need monitoring? If you want emergency dispatch and a warranty, professional monitoring is the way to go; self-monitoring lowers monthly costs and can work for many homeowners. Compare subscription features, contract terms, and response policies before you choose.
Q: How much will a reliable smart home cost for a typical 3-bedroom house? A dependable DIY setup covering lights, a few locks, cameras, and a thermostat generally lands in the $500–$2,000 range depending on brands and scope. Professionally installed packages start higher and often include monthly fees, so compare lifetime costs rather than just upfront prices.
Q: Is Matter worth prioritizing today? Buy Matter-capable devices when they meet your other needs because Matter simplifies cross-platform compatibility. Legacy gear will still require bridges for now, so weigh immediate features against future-proofing.
Actionable plan: pick, buy and set up your first system
Quick take: Pick one hub, plan by room, secure your network, then scale. A focused approach saves money and frustration: validate automations in one room before expanding across the house.
Follow this seven-step checklist in order to avoid common mistakes and wasted purchases: define must-have features by room, choose your primary ecosystem and hub, map devices to rooms and note protocols, prepare the network, buy a starter kit and any dongles needed for protocols, install core devices and create a few automations that solve real problems, then test and iterate room by room. Work top-down from requirements to installation to reduce scope creep.
- Define must-have features by room (lighting, locks, sensors) and set a budget.
- Choose your primary ecosystem and hub: Alexa, Google, or HomeKit plus a compatible controller.
- Map devices to rooms and note protocols (Zigbee, Z‑Wave, Thread, Wi‑Fi).
- Prepare the network: place mesh nodes where coverage drops and segment IoT on a VLAN.
- Buy a single-room starter kit and a hub or dongle for necessary protocols.
- Install core devices and create 2–3 automations that solve real problems.
- Test, iterate, fix edge cases, then scale room by room.
Planned deals and recommended starter kits—Philips Hue White and Color starter kits, Google Nest Hub, Aeotec Z‑Stick, or SkyConnect—can help you get a room working quickly. For broader buying guides and ongoing coverage of the latest devices, check TechRadar’s smart home device coverage. If devices go offline, check power and placement first, then hub logs and network health. For automation issues, simplify triggers, look for conflicting routines, and iterate until rules behave reliably.
We publish HomeKit and Homebridge recipes, plugin recommendations, and network tuning guides so you spend less time guessing and more time with working automations. Use those resources to stabilize mixed-protocol homes and to migrate devices in small, reversible steps. (See Hello world! for a minimal example.)
Final thoughts and next steps
You do not have to buy everything at once. Choose an ecosystem, set a sensible budget, validate automations in one room, and expand only after those automations run reliably. Buy a hub that covers the radios you need, secure and segment your Wi‑Fi, deploy a starter kit, and iterate with a repeatable process.
If you want step-by-step setup guides, plugin recommendations, and long-term reviews, visit The Homekit Hub for tested configurations and problem-focused troubleshooting. Start with one HomeKit-certified bulb or switch, connect it to your Apple hub (HomePod, Apple TV, or HomePod mini), and create a single automation—lights on at sunset—to confirm your approach before scaling.
FAQ
Q: Which ecosystem should I choose if privacy matters most? HomeKit is the privacy-forward option because it favors on-device processing and strict certification. If privacy tops your list, favor HomeKit-compatible devices and local-first controllers such as Home Assistant.
Q: Can I mix protocols and still have a stable system? Yes. Mixing Zigbee, Z‑Wave, Thread, and Wi‑Fi works if you use a reliable hub or bridges, plan your network, and avoid overlapping radios and poor placement. Proper planning and local control for critical automations are the keys to stability.
Ready to build a smart home that actually works
You’ve seen how smart home systems are built: start with visible wins such as lighting, pick a hub and ecosystem that match your priorities, and check protocol choices before you buy. Focus on solving real problems room by room and use local-first tools for safety-critical automations to keep things reliable.
If you have non-HomeKit devices, add Homebridge and bring them in one at a time while watching for protocol conflicts. The Homekit Hub maintains a reference library of tested setups, Matter bridging notes, and step-by-step configuration examples to help you move from pilot to a stable, repeatable system.
Leave a Reply